

The self-hosting bill I never noticed at home
Working with a datacenter partnership and self-hosting both Silver Dragon and Black Dragon for the first time means I also have to keep an eye on my energy consumption bill. So let’s be realistic and post the data — plus the extra charge bill for this month that I received by email this week.
At home, this bill was invisible. The server was just… there, humming in the corner, mixed in with the fridge and everything else. In a datacenter, every watt has a price, a port, and a graph. And the graph does not care about my feelings:
- Power in price: 70 W
- Measured power input: 87 W
- Overlimit consumption: 17 W
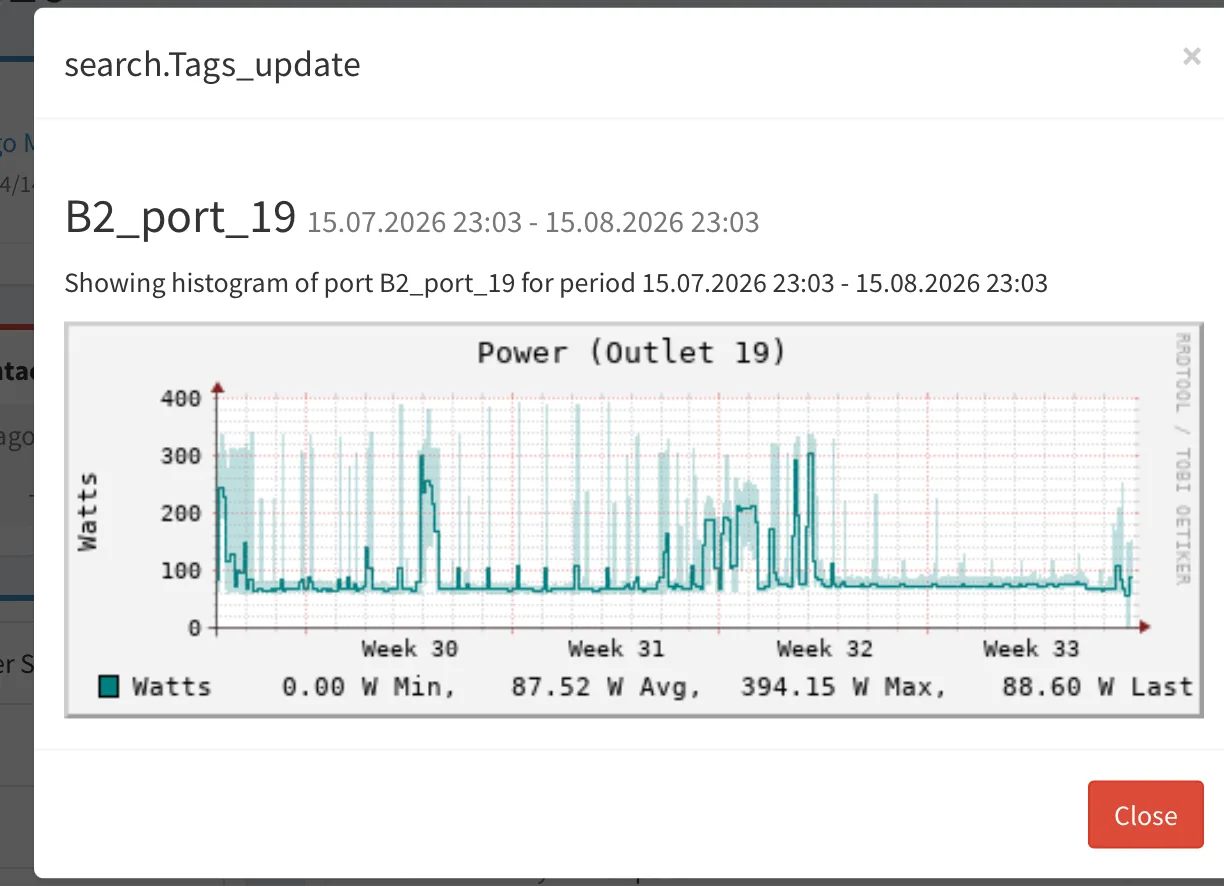
The problem: idle, on holiday, and still over the limit
During my initial planning I really thought I could run Silver Dragon initially at 50 W. But hey — I already increased it once to 70 W, and now I would have to increase it again? Ahhnn, sorry, but no. I do hardware optimisation and maintenance, and I am not letting that happen with my current usage.
And here is the part that really annoyed me: I was on holidays for like 8 days last week — taking care of my life, moving, packing, exploring! The computer was basically idle most of the time. I didn’t even have a SaaS running, or my continuous software development running every day. Not even that!
So an idle machine, with nobody home, was still sitting 17 W over the limit I pay for. It’s time for a fix.
After some investigation I realised there are basically two parts of the work. First, a basic BIOS inspection, to correctly set everything according to my normal usage. Second, a CPU hardware change I decided to do. Let’s go part by part.
Part 1 — BIOS inspection and automated Claude/DeepSeek planning
This is AI infrastructure engineer work, so basically first I spoke the main problem to Claude and told it to help me investigate further. After many tries, I also decided to get a different point of view with DeepSeek, and to propose the CPU hardware change in order to make things cheaper — and I asked for a plan. Afterwards, I went back to Claude and we worked out a plan with all the BIOS changes that could be done in order to reduce the costs. Here is that plan, in full:
The BIOS configuration plan
| Area | Setting | Why it saves power |
|---|---|---|
| PPT / TDC / EDC & Eco Mode | Set the socket power target (PPT) to match the 70 W power envelope I actually pay for, with TDC and EDC current limits scaled to match — Eco Mode territory rather than desktop-flagship defaults | The chip can no longer boost its way past the priced limit just because it feels like it. The power ceiling becomes a configuration fact, not a hope. |
| PCIe ASPM (Active State Power Management) | Enable L0s/L1 link states across the PCIe lanes | An idle PCIe bus should not draw full link power. ASPM lets links drop into low-power states between bursts instead of sitting awake all day. |
| Global C-state Control | Enable C-states (set Global C-state Control to enabled/auto rather than disabled) | Idle cores actually power down. With C-states off, a “sleeping” core is mostly just a warm core waiting politely. |
| SoC & Memory Voltages | Apply a Curve Optimizer undervolt and trim SoC voltage/power for idle efficiency | Less voltage for the same work, and a leaner idle floor from the SoC and memory side — which is exactly where an always-on machine spends most of its life. |
In short:
Power envelope   PPT/TDC/EDC capped to the 70 W I pay for (Eco Mode profile)
PCIe links       ASPM L0s/L1 enabled — no full-power idle bus
Idle cores       Global C-states enabled — idle means powered down
Voltages         Curve Optimizer undervolt + trimmed SoC voltage
With that plan in hand — do you honestly believe I executed the changes myself afterwards?
Really, as an AI infrastructure engineer, I can tell you something: I’m lazy as hell to do manual operations. That was also one of the main reasons why I left Microsoft — I was forced to manually execute changes. OMG.
So no, I didn’t sit there clicking through BIOS screens. Claude did, over KVM:
🎥 Remote KVM Automation Session
In an automated 25-minute session, Claude remotely drove the BIOS interface via KVM over IP — navigating the setup screens, applying the power curves (PPT/TDC/EDC and Curve Optimizer), enabling PCIe ASPM link states and Global C-states, and trimming the SoC voltages, all without any manual intervention from me.
It’s been 4 months that I don’t really do any big operation — or any complicated game installation (WC3 Champions on Bazzite) — myself. And by the way: 0 Windows needs right now.
Checking the results
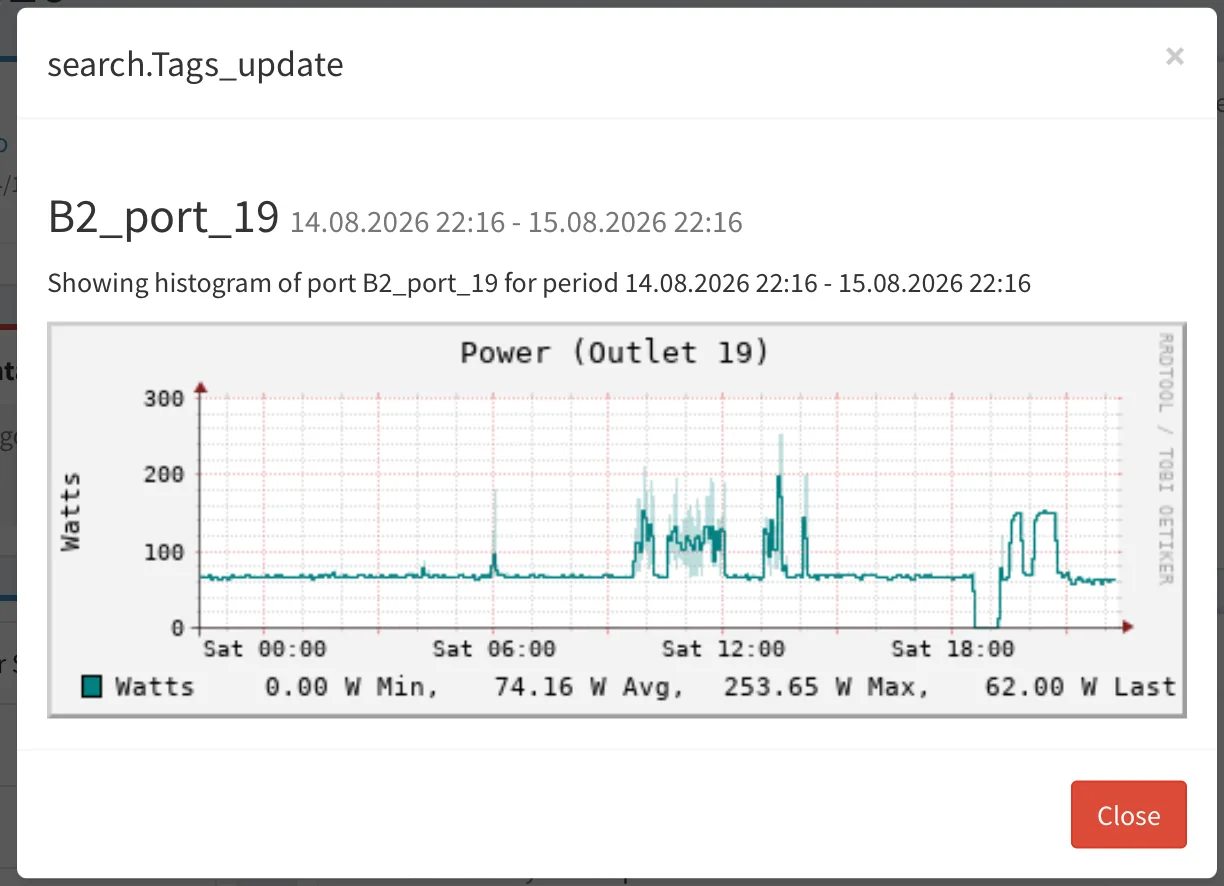
Last watt results after the applied changes already show some reduction over the W average. The floor is coming down, which is exactly what an idle-baseline fix should do. It will take a few days applied before I trust the new average — graphs, like bills, are only honest over a full month.
Part 2 — Hardware swap: replacing the 7950X with the 8700G
For the second part of the work, it’s a CPU hardware change that I decided to do.
The truth is, I bought this hardware for my personal usage. Of course the CPU was never intended to be a server. After comparing with Black Dragon’s energy performance, I noticed the difference in watts consumption versus my real needs. The 7950X is a wonderful chip — and completely overkill for a machine whose most common state right now is waiting for me to come back from holiday. Sixteen cores idling is still sixteen cores idling, and a desktop flagship’s idle baseline is exactly what I’m trying to stop paying for.
The 8700G is definitely the way to go for now: an efficient APU profile that matches the actual workload — serve my infrastructure, stay quiet, sip power. And I can tell you: once it arrived, I changed it! The day I have to scale up, I go back to the 7950X. But for now, the right-sized chip wins.
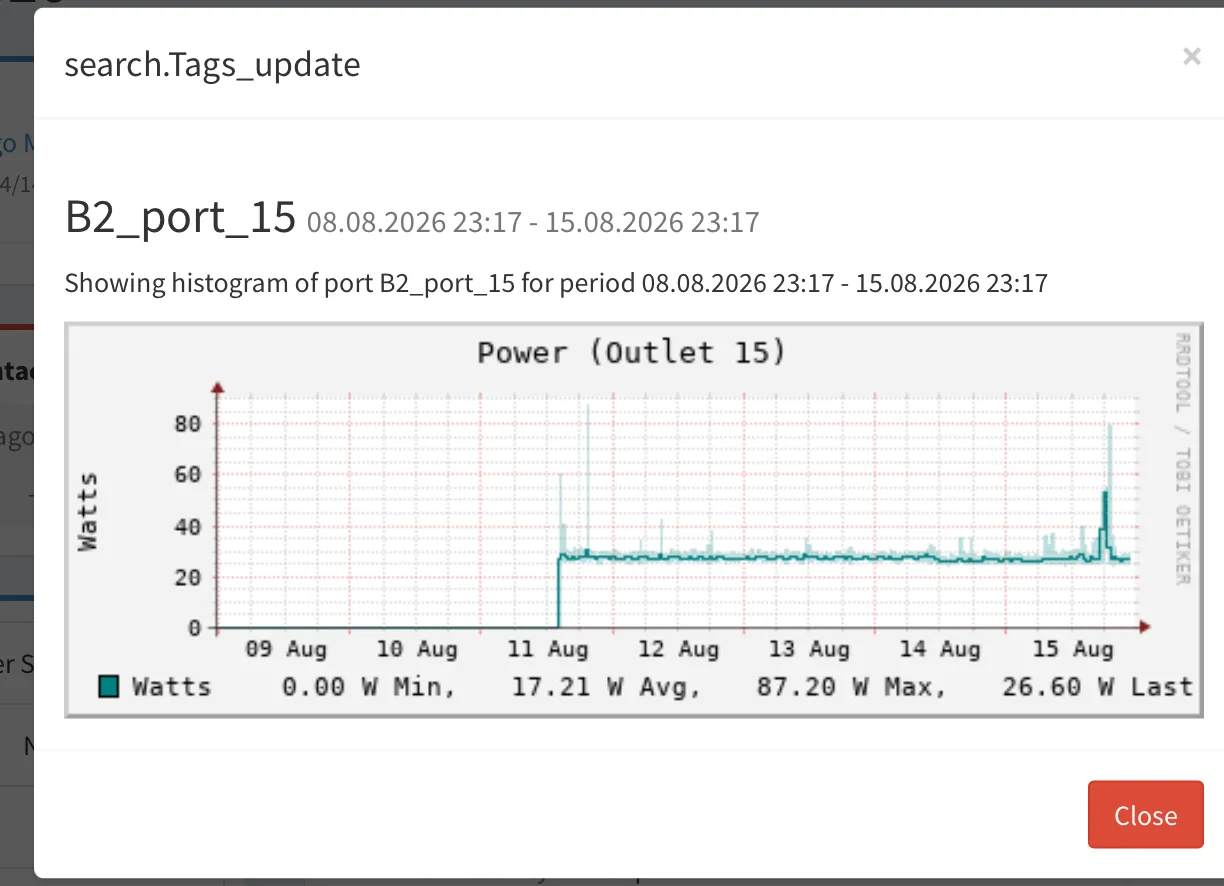
That flat ~27 W line is the whole argument. Same partnership, same kind of graph — one machine sized for what it actually does, and one flagship desktop CPU burning an overlimit fee to do nothing beautifully.
One month later: the results
The 8700G arrived, and I swapped it in — the 7950X is out, the Ryzen 7 8700G is now what runs Silver Dragon (PROD). No more tentative graphs: this is a full month of real production usage (22 September – 22 October), with the machine doing its actual job the whole time.
The numbers from outlet B2_port_19 for that month: 48.25 W average, 40.35 W minimum, and 66.50 W on the last reading. The idle floor and the average power both stabilised well within the 70 W envelope I pay for — compare that with the 87.52 W average that started this whole sprint. The spikes on the graph are real work bursts; the floor underneath them is what I actually pay for, and it stayed flat and low all month.
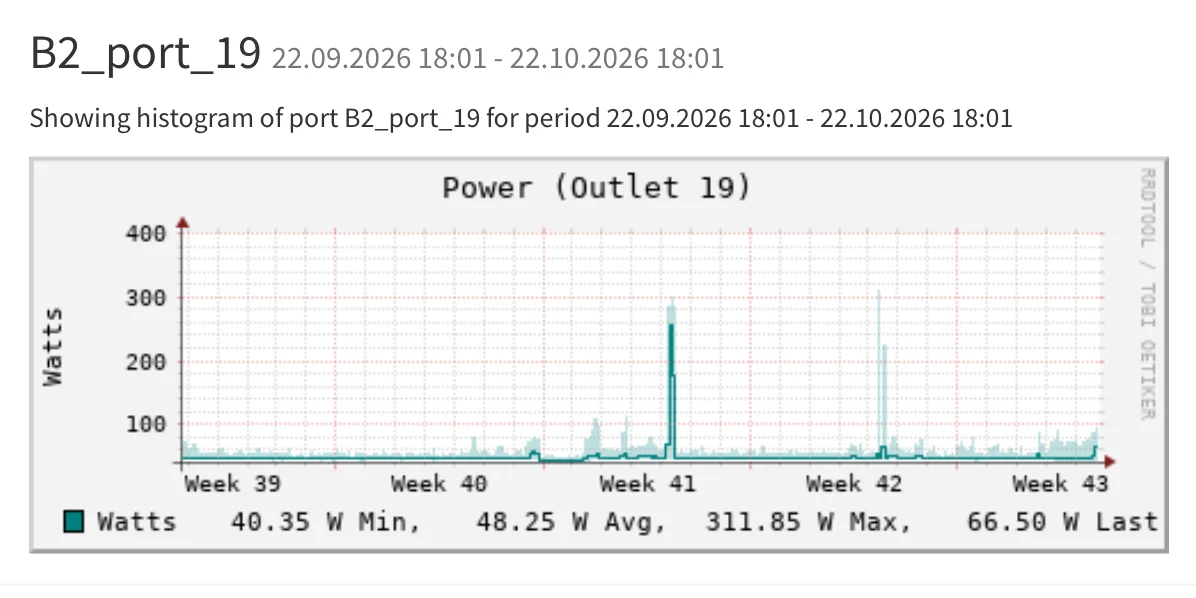
So the conclusion is delightfully boring, which is exactly what infrastructure engineering should be: the BIOS tuning plus the right-sized CPU took Silver Dragon from 17 W over the limit to comfortably under it, on real continuous production usage, across the entire month. The 7950X stays parked on the shelf until the day our workloads genuinely scream for sixteen high-heat cores. Until then, the APU sips power, the datacenter meters stay calm and green, and the bills are finally under control.
What started as an annoyed Saturday troubleshooting session on Claude turned into one of the cleanest self-hosting wins in this fleet.
Thanks for reading and following along with the homelab adventure! If you are running always-on compute in a rack or a closet, go check your idle baselines — your future power bill will thank you.
Catch you in the next sprint! 🚀